Getting Started
Six easy steps to install and get to know basic Index-Manager functions. You’ll be able to try out functions and export before starting your first real indexing project.
To follow along, we recommend you work with a DOCX test file. Download our provided sample-file here: DOCX sample file (66 KB).
1. Download & installation
- Click on “Download trial version” on the right and fill out the download form. Then confirm with “Download + New licence”.
- You will receive an email with the installation package and your personal licence key.
- Click on the link in the email to download the software. It will be downloaded to your computer. Note: Initially, the data storage location is “Downloads” by default. You can also store the Index-Manager exe file as you wish, e.g. in “Applications”.
- Start the installation by double-clicking on the Index-Manager exe file.
- Confirm the warning “The computer has been protected by Windows” with: “Run anyway”.
- Confirm any question that may arise as to whether changes will be made by Index-Manager with “Allow changes”.
- The installation process is completed.
Download
Test Index-Manager now for 14 days free of charge.
2. Start the program
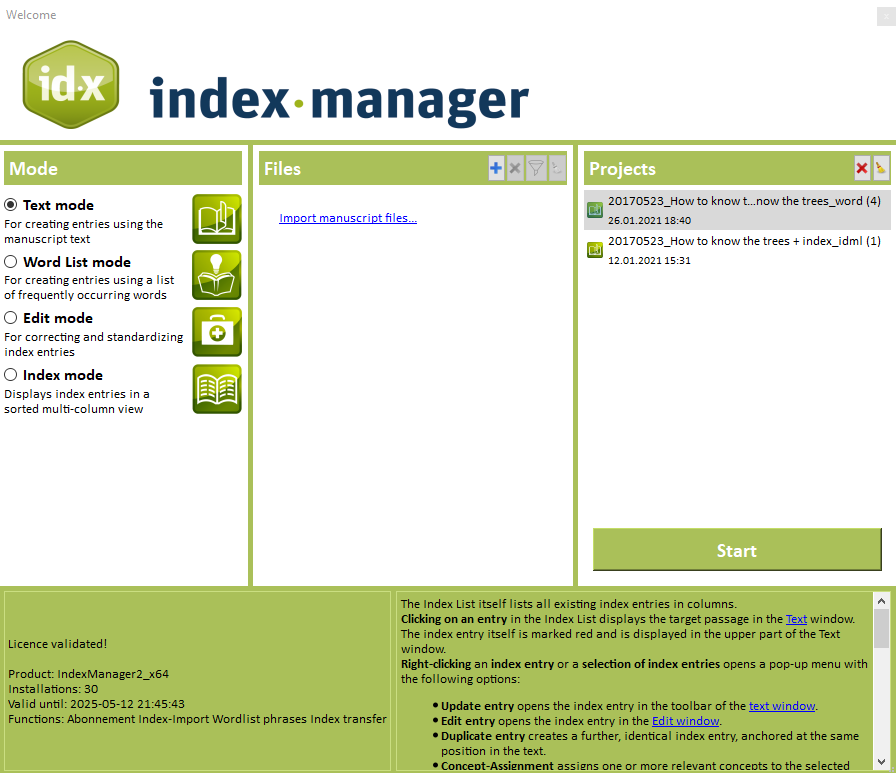
The Index-Manager interface opens with the start dialogue. To load a file, click on “Load manuscript files” in the middle under “Files”. The Windows File Explorer will open. Select the file for which you want to create an index.
- You can load one or multiple document files.
- Possible file formats: DOCX (MS Word), IDML (Adobe InDesign), DocBook, XML (DTD adaptation required).
- To follow along, we recommend you work with a DOCX test file. You can also download our provided sample-file: DOCX sample file (66 KB).
Click the “Start” button. Now you will see the rest of the Index-Manager user interface in front of you.
- The “Text” window shows the manuscript text.
- The “Index” window shows in tabular form index entries that already exist in the text. If there are no index entries yet, the list is empty.
- Open the “window” menu and chose the “Index-Preview” window with a click. It shows existing index entries in a index preview. If there are no index entries yet, the preview is empty.
- Further function windows can be selected in the “Window” menu. They are not needed for the first steps.
The start dialogue
3. Create Index entries
In the Index-Manager window “Text”, the manuscript text is displayed. Scroll through the document to familiarise yourself with it. You will recognise the contents, text formatting, tables and other objects.
For each index entry, select a suitable index term and determine the corresponding position in the text as described below.
Create a 1-level index entry
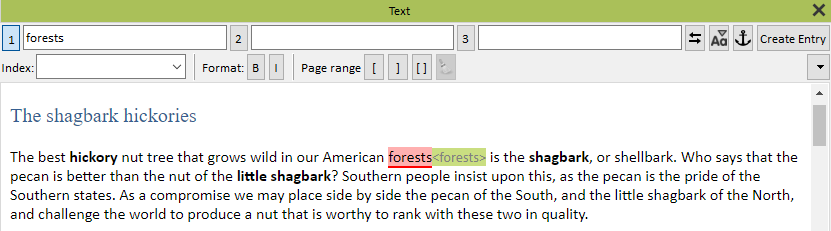
Review the “Text” window of the manuscript text. Select a desired index term or phrase by double-clicking it. The selected text will then appear in the top “Text” window toolbar in field “1” marked in blue. Click “Create Entry” or use the keyboard shortcut [Ctrl]+[e] to create an index entry for this text at the text position. The entry text will then be inserted into the text with a green background. Note that the entirety of the selected text has been set as the index entry.
![]() Of course, you can also index terms that don’t occurr in the text, as well as you can freely chose the position of an index-entry. Learn more in the Index-Manager manual: “3. Indexing in Text Mode”.
Of course, you can also index terms that don’t occurr in the text, as well as you can freely chose the position of an index-entry. Learn more in the Index-Manager manual: “3. Indexing in Text Mode”.
Create first entry
Live monitoring
The created index entry also will appear immediately in the “Index” window and in the “Index preview” window. The first entry for your new index is created!
Now create some more entries of your choice as described to get used to this function.
Windows “Index” and “Index preview”

Edit term on entry
To edit index entry text before creating an index entry (e.g. to adjust inflectional forms such as singular or plural), select the term and the position for the entry by double-clicking as described above, then click in field “1” and change the text as you wish. Set the new text or phrase as an index entry by clicking “Create Entry” or the keyboard shortcut [Ctrl]+[e].
Try this out and see how the new terms also will appear immediately in the “Index” window and the “Index preview” window. Your index is growing!
The toolbar

Create a 2-level index entry (main and sub-heading levels)
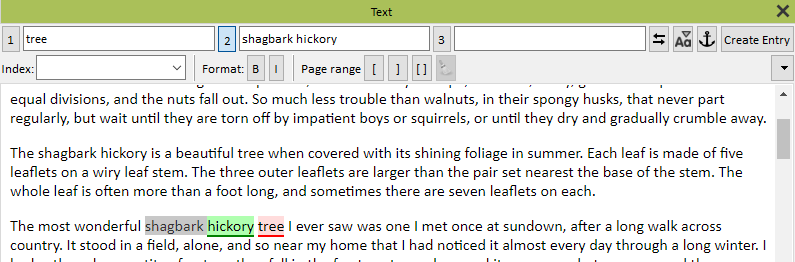
Select the desired term or phrase for the main heading as above, by double-clicking. Once the text is in the “Text” window toolbar in field “1” and marked in blue, click on field “2” to the right of it and enter sub-heading text. Then click “Create Entry” or use the keyboard shortcut [Ctrl]+[e] to set the index entry. Additional levels can also be set this way.
Now it’s your turn again to create some entries of your choice, using one, two or three levels. You can also test out the keyboard shortcuts [alt]+[1], [alt]+[2] and [alt]+[3] to navigate quickly between the entry levels of the toolbar. And make sure you also tested both the button “Create Entry” and the keyboard shortcut [Ctrl]+[e] to find out which works fastest for you.
![]() Learn more in the Index-Manager manual: “3. Indexing in Text Mode”.
Learn more in the Index-Manager manual: “3. Indexing in Text Mode”.
Create main entry and sub-entry
Create cross reference
Mark a term as a new main entry. Click in the top toolbar field “1” where the term appears and add “=” after the term (be sure there are no spaces before and after the equal sign). Then type the cross-reference you want to connect to the term. Follow the form, “[term]=[cross-reference]” (e.g. “FAQ=Frequently Asked Questions”). Set it as an index entry by clicking “Create Entry” or the keyboard shortcut [Ctrl]+[e].
Try this function out in your test project and have a look at how the cross references are displayed in the windows “Index” and “Index preview”.
![]() Use the “Cross-references” window for additional functions.
Use the “Cross-references” window for additional functions.
Learn more in the Index-Manager manual: “5. Cross-references”.
Live monitoring
The created index entry will appear immediately in the “Index” window and in the “Index preview” window.
- The “Index” window displays all existing index entries individually, sorted per default by creation order. The list can also be sorted by each of the columns (entry, sub-entry, …) by clicking on the column header.
- The “Index preview” window shows the index entries as a preview of a set index. The numbers, however, are not page numbers, but IDs assigned by Index-Manager.
Create cross reference

Windows “Index” and “Index preview”

4. Checking the index
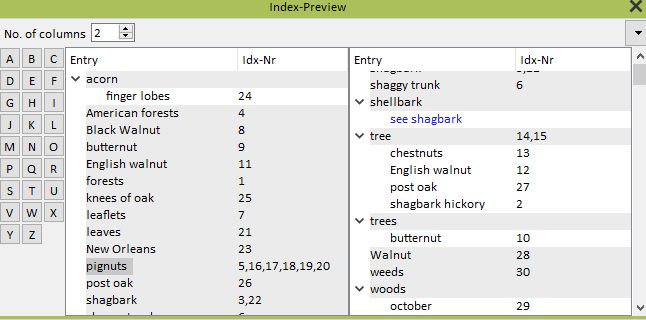
The “Index preview” window displays all index entries sorted alphabetically, with multiple occurrences of terms collated as one entry and with sub-entries indented. Adjust your display to show one or more columns side by side and quickly navigate through the alphabet. To make corrections directly in the “Index preview” window, double-click on entries or sub-entries.
Have a go and edit an entry in the index preview. Double-click on the term, and when the line becomes editable, make a modification. It does not have to make sense for your first test.
![]() Learn more in the Index-Manager manual: “8.1 Correct directly in the Index preview”.
Learn more in the Index-Manager manual: “8.1 Correct directly in the Index preview”.
Edit index entries: If corrections are needed, Index-Manager offers numerous other efficient functions to edit existing index entries individually or groupwize.
![]() Learn more in the Index-Manager manual: “6. Editing index entries”.
Learn more in the Index-Manager manual: “6. Editing index entries”.
Index Preview WYSIWYG
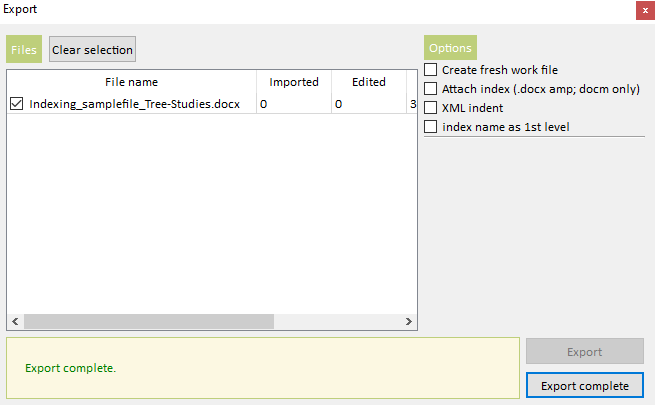
5. Export index entries
- Click on the menu item File > Export to open the Export dialogue.
- Click “Export”. Wait a few moments until “Export completed” is displayed at the bottom left. Done!
![]() Learn more in the Index-Manager manual: “10. Export”.
Learn more in the Index-Manager manual: “10. Export”.
Close Index-Manager. Your manuscript file now has embedded index tags and is ready for further processing, including generating the embedded index.
Export dialogue
6. Optional: generate the index in the manuscript file
During export, Index-Manager inserts index entries into the manuscript file’s true format. The embedded entries can be generated into a full MS Word or Adobe InDesign index by using the native program’s functions. Here is the example in MS Word (DOCX):
- Open the DOCX-file you just worked on in Index-Manager (the sample file, if applicable) in MS Word.
- To see the index XE field tags, click the Home menu “show/hide” button for hidden paragraph marks and other formatting symbols or use the keyboard shortcut [Ctrl]+[*]. Click again to turn them ‘off’.
- To generate the index, position your cursor at the end of the document and click “Insert Index” from the References menu. Your index will then be displayed with corresponding page numbers.
![]() Learn more in the Index-Manager manual: “10.1 Your index in MS Word”,
Learn more in the Index-Manager manual: “10.1 Your index in MS Word”,
or “10.2 Your index in InDesign”.
We hope you enjoy using Index-Manager!

Download
Test Index-Manager now for 14 days free of charge.
More about Index-Manager
This could be interesting for you next:
- Video-Tutorials for creating and editing the first index entries with Index-Manager.
- FAQ with answers to indexing questions.
- live Online-Training on basic and advanced Index-Manager functions every two weeks.
Become an indexing expert
As you index more documents, have fun with Index-Manager’s specialized functions. The software offers more functions, settings, shortcuts and add-ons to make your indexing work easier, such as: creating page ranges, managing multiple indexes (name and location indexes), page count formats, searching, note taking, automatic index actions with regular expressions, index term extraction, group editing, indexing along a word list, and much more.
![]() Learn more in the Index-Manager manual about all functions, software add-ons, customising the interface and more tips and tricks about indexing with Index-Manager.
Learn more in the Index-Manager manual about all functions, software add-ons, customising the interface and more tips and tricks about indexing with Index-Manager.
Share your feedback